
Friday, October 15, 2010
I Finished the Burp Cloths
I finished adding the ribbon to the burp cloths. I did not sew the burp cloths themselves. You can get them from Wal-Mart for $12 a pack. Once you sew some ribbon on them, you can pair about three together to make a cute gift for someone, costing a little over $3.00 for three burpcloths (once you add the cost of the ribbon.)


Thursday, October 14, 2010
My Second Attempt at a Children's Dress
Here is my second try on a children's dress. This time I added some ribbon on the front. When I tried it on my daughter (who again, threw a HUGE fit!) I realized I needed to take it in just a little so I did. I will attempt to try it on her again when she is in a better mood. Interested in knowing the cost of this dress? A yard of this fabric print was $4.44. I was able to make two dresses with it and still had some fabric left over. The ribbon would throw in a few extra cents, but it probably cost me $2.50 to make this.


Tuesday, October 12, 2010
My First Attempt at Sewing a Little Girl's Dress
Tonight I decided I needed to try to use up all of my fabric that I have before I go out and purchase anything new. I was asked if I was interested in a craft fair coming up at the end of October and I think I may give it a try. It may tell me what's hot and what's not! :) Here is all of the fabric I need to get creative with! I have used all of the patterns so far, this is just leftover fabric.


This is the dress from Kohl's that I already had that I used for the pattern. *I did not make the green dress! I hope to get there someday!

While I was sewing, I almost sewed up the arm holes and neck hole, just because I'm so used to turning pillows and bags inside out. Luckily I caught myself before I did it. Here is what it looked like.

Then I had decided to try it on my daughter and realized I had forgotten to sew the seams on the arms, the neck, and the bottom. I had only sewed up the sides, so I had to go back and fix my mistake. You can see the straps are much skinnier now, and next time I hope that they are a little more rounded, like in the photo above.


I wanted to try to make a little girls dress.

This is the dress from Kohl's that I already had that I used for the pattern. *I did not make the green dress! I hope to get there someday!

While I was sewing, I almost sewed up the arm holes and neck hole, just because I'm so used to turning pillows and bags inside out. Luckily I caught myself before I did it. Here is what it looked like.

Then I had decided to try it on my daughter and realized I had forgotten to sew the seams on the arms, the neck, and the bottom. I had only sewed up the sides, so I had to go back and fix my mistake. You can see the straps are much skinnier now, and next time I hope that they are a little more rounded, like in the photo above.

It can be a summer dress or you can put a long sleeve shirt under it for the fall/winter, like I did below.

And, here is my little girl throwing a fit after Mommy made her try it on!!! She was not very happy with me!

My First "Snaps"
I made a little snap purse with the leftover fabric that I had. I wanted to test it out so I put three checkbooks in there. Sure enough it made a cute little home for them!

Empty:

With three checkbooks inside:


Empty:

With three checkbooks inside:


My First Tote Bag
My machine had a small problem. I caused a needle to break because on the last red and white apron I made, I sewed through some thick fabric and the needle just wasn't cut out for that tough job. So it broke and I replaced it and went much slower on my next project.
I am about two weeks into sewing and I sewed my first tote bag today. It's meant for a little girl, and I used the same fabric that I used to make this apron you see in my older post. I try to use up as much fabric that I can, since fabric can be pretty pricey. I still have some of it left and I plan to try to make a few more crafts with it, maybe a little zip up bag. I want to experiment with adding zippers to fabric. I am about to experiment with adding snaps, also.
Here is my tote bag. I even sewed a little pocket inside of it!
If you don't have a Halloween bucket or bag to use, these would be a cute idea--just get some Halloween fabric and sew away! You can put lots of candy in these!


I am about two weeks into sewing and I sewed my first tote bag today. It's meant for a little girl, and I used the same fabric that I used to make this apron you see in my older post. I try to use up as much fabric that I can, since fabric can be pretty pricey. I still have some of it left and I plan to try to make a few more crafts with it, maybe a little zip up bag. I want to experiment with adding zippers to fabric. I am about to experiment with adding snaps, also.
Here is my tote bag. I even sewed a little pocket inside of it!
If you don't have a Halloween bucket or bag to use, these would be a cute idea--just get some Halloween fabric and sew away! You can put lots of candy in these!


Saturday, October 9, 2010
Running Into a Minor Problem!
I am running into a minor problem with my machine that can be fixed but I have to call tomorrow to ask them about it. That puts production at a stop for a little while, but isn't a bad thing since I can take a break. I will post as soon as I get everything taken care of! :)
Friday, October 8, 2010
Two More Cute Aprons!
I finished these two tonight. Now I am ready to try something else! What next? Any ideas?

A children's apron:

Thursday, October 7, 2010
Women's Small Apron
Here is a before photo. Cutting the fabrics to the sizes needed is the hardest part. I still haven't used patterns and have been eyeing everything, and doing quite well with creating my own patterns. I tried a pattern yesterday but it was so overwhelming so I will have to open it again soon and try again.

Here is my finished apron.

Here is the back.

Wednesday, October 6, 2010
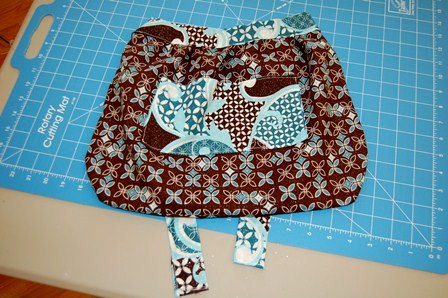
All Finished With the Chocolate Brown and Teal Children's Aprons!
I bought a yard of each of the two types of fabrics used to make the children's aprons below and was able to make four aprons, and I still have some scrap fabric to work with for other projects. Here are the others I made. They are all different. I am finished with the children's aprons for a little while and will be moving on to adult aprons next!



Tuesday, October 5, 2010
Chocolate Brown and Teal Children's Apron
I fell in love with this fabric and thought it would be pretty to add a few complimentary pieces!


Monday, October 4, 2010
My Apron Collection
I decided to move on from pillow making and challenge myself to aprons. I am getting much better. I started with a half apron and then moved to full aprons, and completed another half apron tonight. I even taught myself how to gather the fabric and even made a mistake and learned how to rip open the seam and fix the mistake I had made. Here are the aprons I have made from newest to oldest.

Here are the two different types of fabrics I used for the one above.


Here are the two different types of fabrics I used for the one above.


Starting Out Sewing Pillows
I decided to start experimenting with making pillows first. I chose pillows because when I was a little girl, I would go over to my grandma's house next door and dig into her leftover fabric and try handsewing my own. I remember making a few little pillows and was so proud of myself. Now that I am grown up, I am trying out "pillowmaking" again, and have had much success! Pillows are also very simple to make since you are working with square or rectangle shapes.
Materials Needed:
*Sewing Machine
*Fabric
*Thread
*Rotary Cutter/Cutting Board
*Pins
*Iron/Ironing Board
*Poly-fil
*Ribbon if needed
Here are my pillows so far in order of creation.


Materials Needed:
*Sewing Machine
*Fabric
*Thread
*Rotary Cutter/Cutting Board
*Pins
*Iron/Ironing Board
*Poly-fil
*Ribbon if needed
Here are my pillows so far in order of creation.
My first sewing project, ever. Used fabric that a friend gave me to experiment with.


The Dora Pillow I wanted to make for my daughter's big girl bed!


Experimenting with ribbons around the pillow.

This one is double sided, where the fabrics are different but compliment each other.


What You Will Need to Get Started

A sewing machine and the owner's manual for instructions and troubleshooting.

1. Rotary cutting board and measurer
2. Rotary cutter
3. Fabric scissors
4. Pins
5. Fabric Marker
6. Different Colors of Thread
7. Bobbins
8. Ribbons
9. Fabric

Ironing board and iron
Subscribe to:
Posts (Atom)